How to measure a dog for a harness
A soft tape and five quiet minutes are enough to narrow your choices. The real fit check comes when your dog moves.
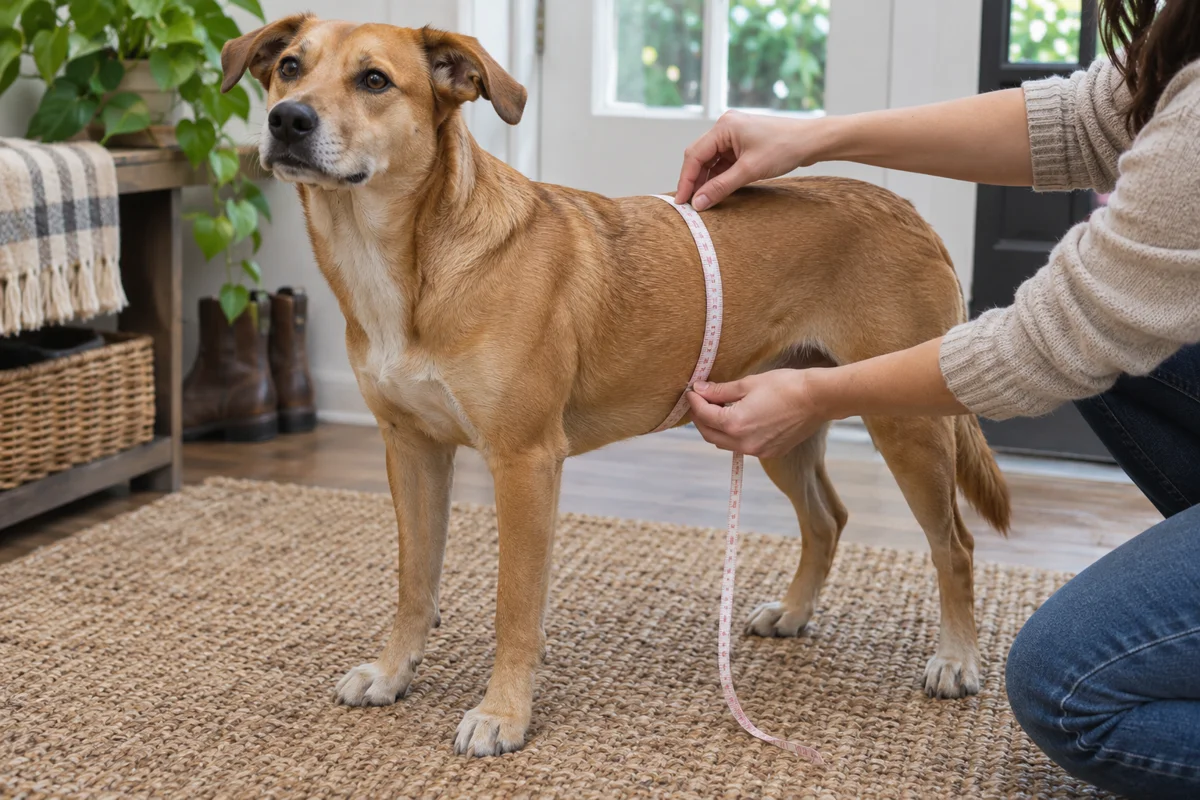
Take the measurements while your dog is standing
Start on a flat surface where your dog can put all four feet down without slipping. A hallway runner or a doormat can help if the kitchen floor is slick. Set out a flexible tape measure, a note or phone to record the numbers, and the size chart for the exact model you are considering. If you do not have a soft tape, use a length of plain string, mark where it meets, then lay it flat against a ruler. Keep hold of the string throughout so it does not become a toy.
For chest girth, bring the tape all the way around the widest part of the rib cage. On many dogs that is a little behind the front legs. Slide the tape forward or back slightly to find the widest point and check that it sits at the same level on both sides. Bring the ends together comfortably without pulling the coat tight against the skin. Keep the tape flat so a twist does not shorten the reading. Note the measurement and whether you recorded it in inches or centimeters.
Some models also call for a neck measurement. Follow the manufacturer’s illustrated measuring points because a harness neckline can sit lower than a collar. Other models ask for chest width or back length. Each number needs its own place in your notes. If you are measuring a dog with a thick coat, repeat each measurement once after smoothing the coat naturally. A tape floating above the fur can add extra room that the dog does not need once the straps settle.
If the dog leans away or sits as soon as the tape touches, take a break. Set the tape down, allow the dog to walk a few steps, and try again later. A helper can offer a treat at nose level while you take the reading. Keep the session short enough that the dog can move away freely. Two calm attempts will usually give you a better number than one long attempt spent straightening a wriggling dog.
Use the chart for that harness model
Start with the recorded chest measurement and compare it with the stated adjustment range. Two medium harnesses from the same brand can fit differently because their straps meet the body in different places. If your dog is near the edge of a range, check where the neck measurement falls as well. Read the manufacturer’s advice on overlapping sizes and see whether the product can be returned after an indoor fitting. A dog that needs the largest chest setting and the smallest neck setting may be better served by a model with more independent adjustment.
Consider how the harness goes on. An overhead design needs enough clearance to pass over the head before you tighten the adjustment straps. That may matter for a dog with wide ears or a dog that dislikes having things passed over its face. A model with a neck buckle gives you another way to put it on. A step-in style can suit a dog that willingly lifts its paws but can be awkward for a dog that shifts away when you touch a leg. Pick a design your dog can put on at its own pace.
Keep the intended use in mind while you compare models. A harness for neighborhood walks should be easy to adjust and easy to inspect. If you routinely walk in a raincoat season, check whether the manufacturer allows the harness to fit comfortably over that garment without moving the buckles into the armpits. A normal walking harness should never be assumed to be a car restraint. For travel, look at the instructions of the restraint system you actually use, including how it attaches and the size range it supports.
Make the first fitting indoors
Lay the harness out and identify the chest piece, the buckles, and the leash attachment before you put it on. Loosen the adjustable straps enough to get it on easily. Fasten the buckles until they close fully, then adjust both sides in small changes. You want the front piece centered, with the strap behind the front legs far enough back that it does not crowd the armpit. On a harness with padded sections, check that the flat sides of the pads sit against the coat and that a folded strap is not trapped underneath.
Run a finger beneath the straps to feel for a pinch point, then follow the manufacturer’s fit guidance for how much clearance the design needs. Some guides use two fingers as a starting point. Finger size, coat thickness and strap shape all vary, so combine that test with watching the dog walk. Check that your dog can stand, sit and turn comfortably. If the chest piece slides off center or a leg can come through an opening when the dog backs up, the harness needs a different adjustment or size.
Take a short walk and check again
Begin in a quiet, enclosed space or on a low-traffic route. Walk at the dog’s normal pace and use light leash contact. Watch from the side as each front leg comes forward. Look for a strap that rubs the armpit, a buckle that turns inward, or a front piece that slides sideways. A harness that looks centered when the dog stands still can shift during turns. Give your dog room to turn in both directions and stop if the dog repeatedly paws at the harness, freezes or tries to back out.
Take the harness off when you get home and look under the areas where the straps rested. Part the fur lightly if it is thick. Note any redness, pinching or places where the coat has been rubbed in an unexpected direction. Also check for grit or folds that were not there before you left. A twisted strap can often be corrected by rethreading it flat. If the same contact point returns after adjustment, compare the shape or size of another model rather than tightening the troublesome strap.
Keep a fit note you can use later
Write down the model, the size, the chest measurement and which straps you adjusted. Take a simple side photo when the dog is comfortably standing in the harness so you can compare where the strap sat after washing or adjusting it. Check the fit again after a haircut, a noticeable change in weight, or a growth spurt. For a puppy, keep the paper size chart with your notes so the next fitting is easy to check without guessing which range you bought.
Before each walk, a quick check of the clips, stitching and leash attachment goes a long way. Make sure each buckle closes properly and that the leash is clipped to the intended ring. A frayed strap or cracked clip deserves replacement. Keeping the leash and harness together by the door makes the check easier to remember, especially when someone else walks the dog.
If two people share walking duty, show both of them where the straps sit before you put the harness away. A quick photo is especially useful for a sitter who has never used that model. Put the photo next to the walking instructions and note which ring you normally use.